newRPL Keypad Overlay - v6
The newRPL keypad overlay is done! (Well, done enough, at least for now!)
Just a few tweaks on the design: - Rounded the bottom of the openings for the keys on the keypad - Tweaked the position of a few keys for (maybe) better alignment. - Rounded some of the corners of the overlay background.
All the files are available for download if you'd like to print some for yourself.
New overlay
Here's what the overlay looks like now.
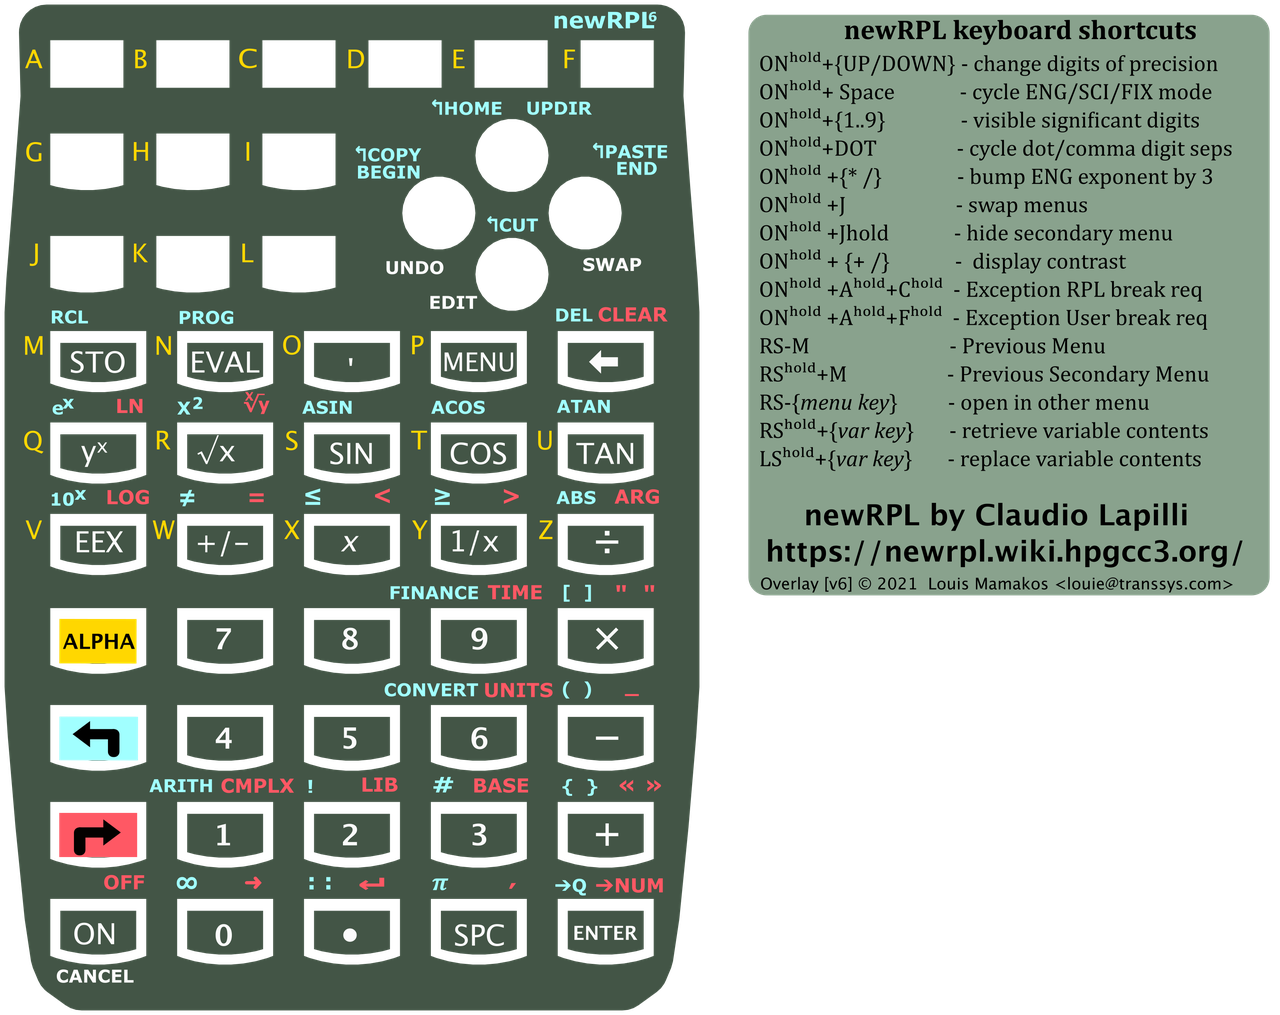 Version 6 of keypad overlay
Or here's the link directly to the keypad6-600-dpi.png file.
It includes a label for the back of the calculator with other helpful reminders. Unfortunately, it does cover the reset hole on the back of the case. I managed to re-flash my calculators with newRPL prior to applying the label on the back, so it presented no problem at the time. I didn't account for the location of the reset hole when laying-out the text for the back label, though I think a small hole could be punched without too much practical impact.
Cutting and pasting
If you'd like to reproduce this for yourself, I'll try to explain my experiences in a little detail so that you might not have to learn as many things the hard way as I did.
At a high level, you print the graphic on some media at the right scale. The media will be applied over the front of the calculator and over selected keytops.
I used printable white adhsive vinyl, printed on a laser printer. Then I used an automated cutting machine to cut out the keyboard holes and keytops, rather than trying to perform that operation by hand.
I tried two different techniques to fabricate the overlay, with an eye to improving the visual appearence and provide a durable surface for the keytops that won't wear as fingers are operating the keys.
A tale of two techniques
I printed and cut two versions of keypad. Both started with the same image printed on the white Vinyl Sticker paper as before. I printed these on my Brother HL-L8350CDW color laser printer at 600 DPI. Then I tried two variations, one was sprayed with a Krylon UV-Resistant Clear Acrylic Coating, and the other with a clear vinyl sheet cover. The goal was to cover and protect the toner that was printed on the vinyl sheet.
Common beginnings
Both approaches start the same way with printing of the printable white vinyl adhesive material with the graphics of the keyboard overlay. In my case, this was done by the software that was used to drive the Cricut cutting machine, as it adds alignment marks that the cutting machine scans for.
Acrylic coating approach
My theory was that the sheet sprayed with the clear acrylic coating would have an overall thinner profile and result in a better "feel" for the stickers on the keys. But the clear vinyl cover visually is more attractive.. Will the thicker stickers on the keys be too uncomfortable? We'll see.
Once the printing is completed, spray the printed vinyl sheet with the acrylic coating as directed by the product's instructions. In my case, it was recommended to wait 2 hours after application before "handling."
At that point, the material makes trip through the Cricut cutting machine. It has been patiently waiting since printing for that process to continue.
Clear vinyl sheet overlay approach
Once the white printable vinyl has the graphics printed on it, then the clear adhesive vinyl is applied over it. This is tricky. The goal is to get this applied without introducing any bubbles in the clear vinyl and you don't want to wrinkle or otherwise distort the white vinyl you just printed stuff on. I borrowed some crafting tool from my wife that's apparently built for just this purpose - small rubber roller about 4 inches in length that can be used to roll-out and roll-over the material as you carefully apply it. Of course the clear vinyl material is shipped in a roll and won't convieniently lay flat. And the white vinyl, having taken a trip through the laser printer isn't just lying around on it's own, either.
You pretty much only have one chance to get this application right - the adhesive on the clear vinyl sticks real good to the white vinyl under it. Small bubbles can get rolled out, of course you want to avoid those.
The sticky clear vinyl sheet applied after printer probably is more durable and seems to be visually more appealing. One effect of having that clear vinyl applied is that the cuts made by the Cricut Maker cutting machine seem to be "cleaner." When the white printable vinyl is cut, it appears that there are either micro-tears as the blade cuts, or the toner right at the cut is flaked off. The visual effect is that you can see some of the white color of the vinyl at the edges, while the version with clear vinyl applied over it before the cutting has nice clean edges.
Comparisons
Here's a close-up of the two different versions:
 Vinyl Overlay
 Acrylic Spray
(click on either image for a higher resolution version..)
The clear vinyl covered version didn't complete the cutting process as well as hoped. This is entirely an artifact of settings used in the Cricut application as the choice of material determines the cutting force of the knife blade. Too light a touch, and the cut doesn't get both the clear vinyl cover and the printed vinyl. Too heavy a touch, and you cut all the way through the printable vinyl backing, making it harder to peel the sheet off the cutting surface as it leaves all the key labels behind.
The last attempt was pretty close, though the cutting force might be a little too high as some of the thing cut outs between the button labels and the overlay came loose during cutting. This can be tweaked further, but was close enough that I got usable results.
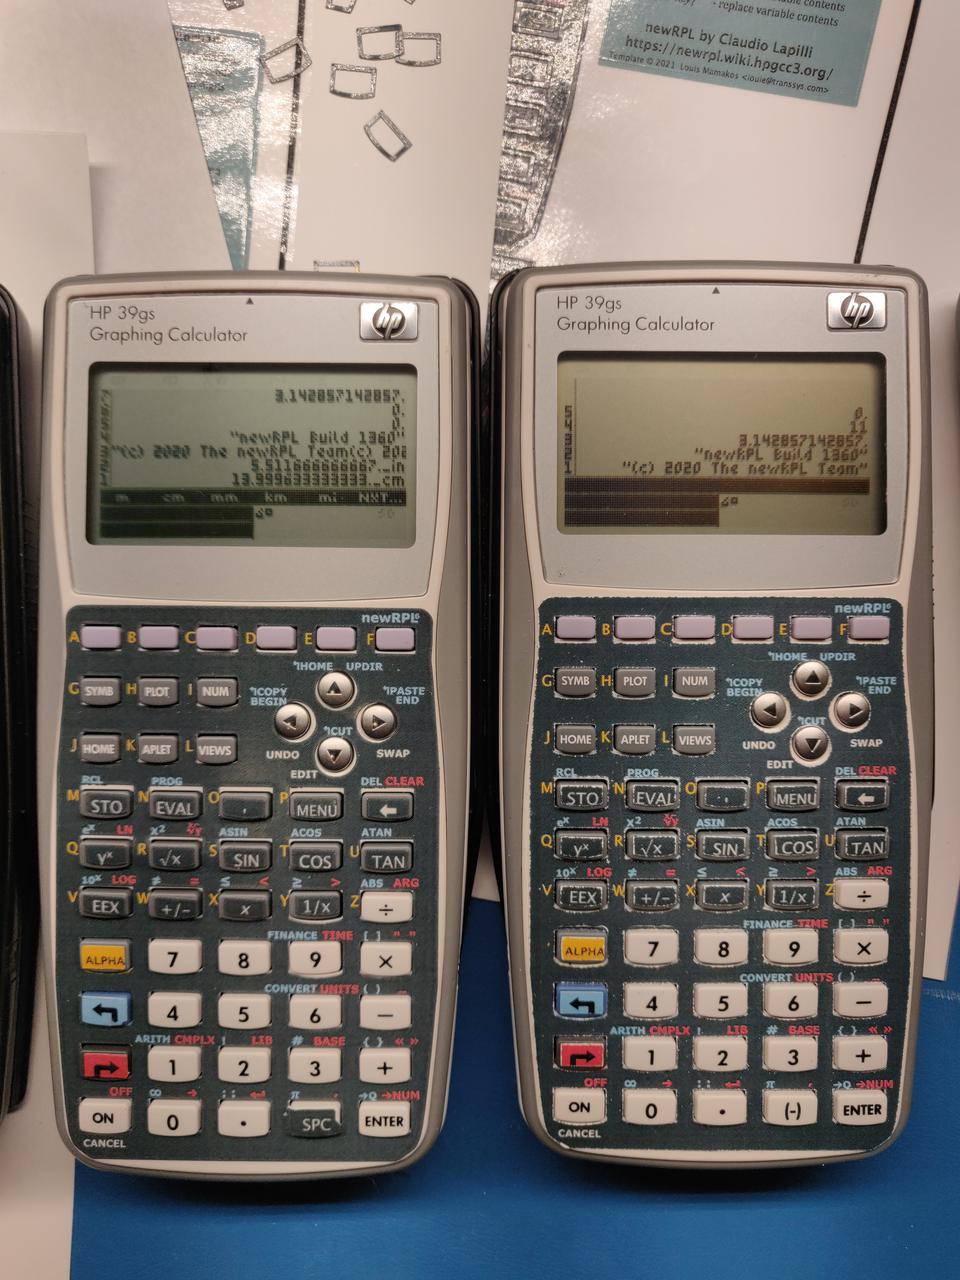 Vinyl and Acrylic Spray versions
Application of the overlay
Preparation
I'd recommend wiping down the keyboard with some isopropyl alcohol. Perhaps one positive outcome of our COVID-19 sequestration at home is that we're probably all got some IPA hanging around the house somewhere.. This will wash away any skin oils and people grease from the keytops, ensuring good adhesion of the stickers.
The product that I used seems to have pretty good properties in this regard. I've gone through about 4 iterations of applying and removing the overlays. The adhesive on the printable vinyl sticks pretty firmly; if you apply the stickers in the right spot, they seem to stay where you left them. (Granted, I've not done an experiment of leaving them in a hot car with elevated temperatures..) And should you have occasion to remove the vinyl, it comes off without leaving gunky glue residue behind.
Application of the background
This will need to be peeled off the backing material. And this is the tricky part - removing the background, making sure that the thin "ring" around the keytop sticker doesn't come along. This was only a problem for me when I used the white printable vinyl, then covered with the clear vinyl sheet. This is a bit thicker and I don't think the cutting force was quite right.
You'll mostly want to start from the center of the keyboard and work outwards from there. Try to lightly lay it down without sticking it down to verify placement, and then work from the center upwards and downwards to smooth out the overlay.
Application of the keytop stickers
You really, really want to use some tweezers to apply the stickers to the tops of the keys. It's a very effective way to get the placement just right, which will be really hard to do with your big fat thumb and fingers.
While the layout for the keyboard overlay has cut-out key labels for all but the "function" or "menu" keys, I only apply the stickers to the keys that would otherwise be labeled wrong. This means the 3 rows below the function keys (rows with STO, y^x, and EEX), though I didn't cover the divide key. I also applied the stickers for the left-shift, right-shift and alpha keys.
This leaves the whole of the numeric keypad original, and the arithmetic keys. I also didn't bother to label the SPC key, which on the HP 39gs has that "(-)" legend on it.
The back
There's also the sticker that fits on the back of the calculator into the inset below the battery compartment. This covers the serial number sticker, as well as the reset hole. As designed, there is slightly more margin at the top and bottom, so when placing this sticker, start with one edge of the sticker aligned with the left or right edge of the inset.
Which of the fabrication techniques is better?
After a couple of days, I think the clear vinyl applied over the white printed adhesive vinyl is a superior result. Visually the result is better, without the artifacts of the cutting processing being visible at the edges, which are much cleaner.
The downside is that the application was a bit more troublesome, but I believe this is a result of having not quite the right cutting force. A bit more experimentation is going to be necessary for any future versions.
The printed vinyl sprayed with the acrylic coating looks like there'd be extra
durability for the keytops, but visualy the cuts don't seem to come out quite as "clean."
It would be interesting to see if ink from an inkjet printer works better than
my experience with the toner from my color laser printer. If inkjet ink does maintain clean
cuts, it will be easier to fabricate than the version with the clear layer of vinyl
applied. Applying that layer of clear vinyl without introducing bubbles is also somewhat
of a harrowing process..
How to make one of your own
Use it as-is
You could take the PNG file above and import that into some tool for printing and cutting out a keyboard overlay. The PNG file has an alpha channel, and the transparent parts of the image are intended to be cut away. Dropping this into the Cricut Studio tool as PNG file results in it "doing the right thing" when it comes to deciding where the cuts need to be made.
That PNG file was rendered as a bitmap at 600 DPI, which reflected the resolution of the laser printer I happen to have. If you have a higher resolution inkjet printer, you might try to regenerate it at a higher resolution for improved quality. I deliberately chose to match the native resolution of the printer to avoid further downstream rescaling that might do damage to the font rendering.
If you happen to have a Cricut machine, possibly you can just use my existing project in Cricut Design Space and "make it" from there.
Danger! Warning!
If you want to use the file as-is, you'll need to ensure it's imported into whatever tool at the right size. I had some difficulty that had me chasing ghosts with the Cricut tool, as there is a very small transparent border in the PNG file. When the Cricut Studio tool imports the image, it seems to compute a bounding box around the visible elements.
The important dimension is the height of this bounding box which is 110mm high. The exported PNG file has a 0.5mm transparent border, meaning that it's exported as a 111mm high PNG file. If this is scaled incorrectly as 111mm, the spacing between the keys will be slightly off and you will (also) waste time chasing ghosts.
The files used to produce the overlay
- keypad_templage.scad - OpenSCAD source file
-
keypad_templage.svg - OpenSCAD SVG export of the
keypad_template.scadfile - keypad.svg - Inkscape file with text labels, colers, etc.
- keypad6-600-dpi.png - my final output, exported from Inkscape
The OpenSCAD part
At a high level, the location of the keys and dimensions of the overlay are built programmatically using an OpenSCAD script. My assumption was that it would be easier to manage a grid of the keys of various sizes and tweak all of them during tuning by changing constants in a script, rather than manually dragging stuff around in Inkscape.
OpenSCAD is used to export an SVG file that's used subsequently.
The Inkscape part
If you're not familiar, Inkscape is an open-source illustration program, with goals similar to to Adobe Illustrator. The file that contains your inkscape project is itself an SVG file, with a bunch of extra inkscape specific metadata squirrled away in there, too.
The inkscape file here contains a number of layers. The base layer is the SVG file generated by the OpenSCAD script. It's imported into Inkscape and then you specify the fill color (perhaps a darkish green color like I chose?) and no stroking around the edges.
Other layers are used, each for different types of alphabetic objects. These are separated into different layers for labels for "Left Shift", "Right Shift", "Unshifted" legends, keytop labels and the text for the label intended for the back of the calculator.
Of course, you need to manually align these labels with the geometry of the keyboard buttons.
Finally, you can export a PNG file in RGBA format, with an alpha channel containing transparency information. It is at this step that you can choose a resolution that you want the exported PNG file bitmap to be rendered, depending on how you'd intend to print and cut it.
Once completed, you can end up with a file similar to the version 6 file keyboard overlay file displayed at the top of this blog post.
Improvements?
Running out of space on the overlay to add additional information. There might be a random shift-key that remains to be labeled?
I think there is room for improvement in the key spacing; it's not quite exactly right. The key holes could be a touch larger. This would avoid any binding at the top of the key as its pressed, which can negatively affect the delicious "feel" of the HP calculator keyboard.
The placement of the keys done in the OpenSCAD script can be reworked a bit. The original approach was a list of the relative spacing between adjacent rows. This seemed to be a good idea, except when it comes time to tweaking the spacing. If you add a little bit more space here, you need to make up for it over there so that the overall dimensions don't change. This should just be changed to absolute offsets from the origin (which is the bottom left corner of the ON key..)
Conclusion
At this stage, I'm "done for now." I think that I want to get some experience with both versions of the keypad overlay (clear vinyl cover or acrylic spray) to compare the relative durability and "feel" of each alternative. And see what other tweaks might be useful.
As I've mostly exhausted the initial set of supplies I bought, that also was a hint that I have arrived at the "minimum viable" point in development.
This was a great opportunity to learn a bit more about OpenSCAD that I've been using for 3D modeling of functional parts to be produced on my Ender 3 FDM 3D printer. And while I've been aware of Inkscape before, this project provided a great opportunity to get some skill at using that tool. Having a specific problem to solve surely help direct effort when learning about the tool.
And of course, I'm now just starting to be dangerous with ("my wife's") Circut Maker cutting machine. This might be a great tool for doing front panels for little hardware hacks and stuff..
I'm making these files available for free for non-commercial use as you like.
Thanks
Last, but certainly not least, thanks so very much to those that have invested all that work in newRPL! Such a wonderful thing, I can now have "new" RPN/RPL calculators in my life again. I no longer need fear the day my HP 48G finally dies. Of course, I have plenty (too many?) of newRPL calculators to carry the day as needed, and the luxury of having them at both my work desk and at home. Yay!
Comments