newRPL Keypad Overlay - v7
I was slightly premature in declaring done before. Here's another version of the newRPL keypad overlay with a few minor tweaks in the button spacing.
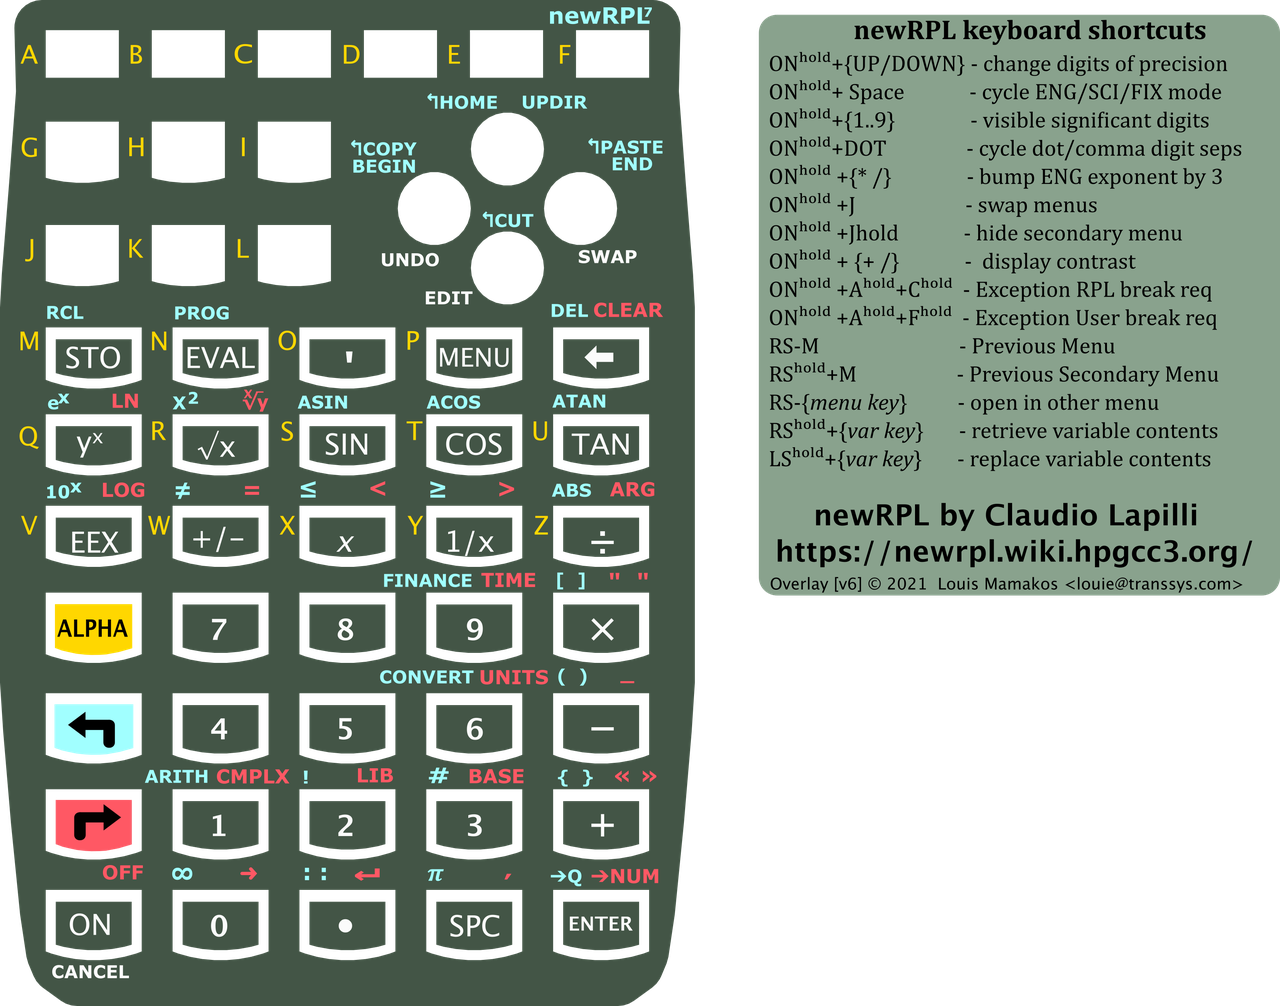 Version 7 of keypad overlay
Newer and slightly improved
Line 'em up!
The most substantive of the changes has been to tweak the geometry of the keyboard button row spacing slightly. As I was already off chasing some ghosts in my attempts to dial this in, I changed the way that the keyboard button locations were defined.
Previously, this was done as offsets from the previous row of buttons. This made sense at the time as there seemed to be only 3 or 4 different spacings between rows. However, when the time came to slightly tweak the row locations, adding half a millimeter here means subtracting it elsewhere as all the subsequent rows would have been affected.
Now, there's just an array of Y-axis offsets for each row, which each can be independently tweak and tuned as desired. This probably shouldn't have been necessary, but my initial thought of the rows being offset by exact millimeter units turns out to not be the case. Or maybe it really is, and I'm chasing after the dimensions of the printed vinyl changing after making a trip through the fuser assembly in my laser printer.
Inkscape graphics
I made some small tweaks to the size of location of the character labels to reflect the change in the cuts for the keyboard button holes.
The manually constructed labels for the shift keys now have the same rounded bottom edge that all the other keys have.
The files
- keypad_templage.scad - OpenSCAD source file
-
keypad_templage.svg - OpenSCAD SVG export of the
keypad_template.scadfile - keypad.svg - Inkscape file with text labels, colers, etc.
- keypad7-600-dpi.png - my final output, exported from Inkscape
Hints on how to install
Having removed and applied the printable labels on a number of occasions now, here are some thoughts on how to have this go as smoothly as possible.
- Clean the calculator buttons with some isopropyl alcohol. This will promote good ahesion of the printable vinyl.
- Peel off the "background" vinyl sheet, and try to leave all the button labels behind, as well as the tiny rings that occupy the space between the edge of the holes and the button labels.
- Align the holes in the "background" vinyl label to the edge of the bottom of the keyboard buttons. Remember, that when the keyboard buttons are depressed, the keys rotate forward slightly, and there needs to be small gap for the button body to rotate into.
- I've found that for me, working from the bottom row of keys gives me a good result. Once aligned, stick down the bottom of the label, and then work upwards and smooth the label from the center of each row to the outside edges as you go.
- Affix the button top labels. It's essential that you find some small tweezers to do this, unless you have the small delicate fingers of an angel. Place the sticker in the correct, centered spot on the button and then press down with your grubby finger, while releasing the tweezers.
Future work
I think this now is largely complete, so far as the design of the label. I'd like to find a way to produce and distribute these for those that want them for their own, but I'm not quite there yet..
My preferred way to fabricate these is to apply a thin transparent adhesive vinyl sheet over the printed label. This is to provide a durable surface over the laser printed toner. I tried spraying the printed label with a UV protective layer, but there are ugly cutting artifcats.
But when cutting the sandwich of the white printed vinyl (on a backing) and the clear vinyl sheet, I will occasionally drag the thing rings around the button labels, or a button label itself during the cutting process. I think that I need to continue tweak the cutting pressure (and/or maybe get a sharper or different cutting blade?)
I don't have much time to delve much deeper into the arts-and-crafts aspect of the project right now to turn this fairly manual process into a repeatable, high-yield production of the labels. We'll see how this might play out in the future..
Enjoy!
If you've tried to produce these yourself, I'd be very interested in hearing feedback on your experiences. In particular, if you're printing using an inkjet printer on white printable vinyl, how that's working out?
Follow-up in the thread on the Museum of HP Calculators in the newRPL keyboard overlay forum thread with your experiences.
Comments